Friday 19 February 2016

Magazine research: DAZED


Beginning my magazine research with an exciting front cover magazine DAZED, I selected this magazine to be one of my five magazine's to research because the covers always draw me in with the bold colour, bold lettering, strong structure of position within the model and I just love that most of their covers incorporate abstract within the work some way whether this in shown within the clothing or the background and really shouts out an creative read! 

DAZED is formerly known as Dazed & confused which is a monthly British styled magazine that was founded in 1991 by the founding editors Jefferson Hack who has an reputation for success in journalism, film, photography, television, digital media and Rankin who's a well known successful fashion photographer. DAZED did hit the magazine world first as a black and white poster but soon became colour promoting music, fashion, film, art and literature. And the articles telling us what happening in the world of music fashion and art with the articles being a mixture of informing their audience with news and also the own opinion especially in the music articles as it holds quite a few news and opinions on the through the wire singer Kanye West. The audience of Dazed is to be a lot more open minded of beauty and views as a lot of their covers show a visual frame of thin models to reflect more of a masculine frame. With make up applied not to flatter the feminine features but make up that makes features more masculine that goes hand in hand with the bold abstract feel to the overall image.           


  • Fig 1 -  Tim Noakes. (2013). DAZED. Available: https://visualmaniac.com/uploads/visualmaniac_magazine_number/dazed-and-confused-october-2013-cover-digital-magazine.jpg. Last accessed 19/02/2016.
  •  Fig 2 - Tim Noakes. (). DAZED. Available: http://cdn.trendhunterstatic.com/thumbs/dazed-and-confused-magazine-3D.jpeg. Last accessed 19/02/2016. 
  • Fig 3 - Tim Noakes. (2015). DAZED. Available: http://fasttw.com/wp-content/uploads/2014/11/Kendall-dressed-in-a-total-lookbook-Urban-Outfitters--590x768.jpg. Last accessed 19/02/2016.        
  • Fig 4 - Tim Noakes. (). DAZED. Available: http://i.dailymail.co.uk/i/pix/2014/11/25/237E959500000578-2849010-image-12_1416931441655.jpg. Last accessed 19/02/2016. 
  • Fig 5 - Tim Noakes. (2014). DAZED. Available: http://www.theluxechronicles.com/.a/6a00e54f05e1bb883401a3fc41f67d970b-pi. Last accessed 19/02/2016.
  • Fig 6 -  Tim Noakes. (2015). DAZED. Available: http://www.newsstand.co.uk/i2440068/Zoom/DAZED--CONFUSED_SPRING.jpg. Last accessed 19/02/2016.

Blocking brow and incorporating lace by me

So the lesson was all about blocking the brow and then applying lace what will also take the eye away from the brow, with this lesson I came over not feeling well so I actually modelled for the lesson.
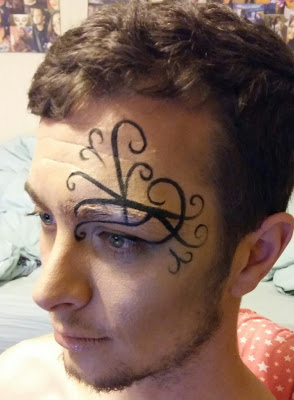
Because I didn't do the look in lesson so done this look at home but not having a female face to practice from my poor boyfriend Mark had to sit in the make up seat! This should be fun!

So first I wanted to make sure Mark's face was clean from oil or any dirt that may have built on his face throughout the day by cleansing and toning the skin once I applied this to the skin I then moisturised the skin making sure it was all prepped ready for when I apply this application. Now to start on those beautiful thick brows brows he has, should of done on myself as my brows would of been easier but I wanted to give myself a challenge! To start I applied spirit gum to eye lash brush and leaving this to go tacky for a minute as this will help for the brow to stick easier and quicker! Applying this to the brow but instead of grooming through the brow the right way I went in the wrong direction this is so all the hairs are coated, once I felt I coated all the brows I groomed in the right direction and then flattened the brow down with a spatula making sure the brow is flat to the skin otherwise will cause the brow to lift. Once I had flattened to the models skin I left this to dry for for a minute or two making sure it sets and cleaning up any excess spirit gum has gone onto the skin so using a cotton bud with pro clean, normally would use MME that would clean it up but as I didn't have any but it still the job as the pro clean is an oil based liquid and when applying to the spirit gum it really wears down the spirit gum from the skin. Once was dry and cleaned up I went in with my powder puff applying Kroylan translucent really pressing this in cross the brow making sure all is covered. Leaving this to set into the brow for a minute or two, once set went into the brow with D32 from my derma palette this will help take any darkness away and neutralising the brow. Noticing after once layer of D32, after powdering down I will need to apply another layer as the brows are quite dark at the beginning of the brow so after the first layer and powder down I waited for this to set as I didn't want to move any of my product underneath.

The brow had settled and was time for my second application of D32 and powdering down, doing the same techniques by stippling the product on, not dragging across as I didn't want to move the build up of product underneath. Stippled the whole brow again was time to powder down for the next layer!
Waiting for this to set into the brow I began to mix my concealer from my derma palette using the colours D3, D4, D5and D32 to give little extra warmth! Making sure my concealer is mixed well and is warmed up as I didn't want the product still be stiff as this will cause my application to not apply as well as I will like so to get a smooth application I made sure before applying this was warmed up working into the product on the back of my hand as working off the back of your hand will help warming up the product.
With the brow not set and my concealer mixed and warmed up I stippled again like I did with the D32 to the brow and taking this outside the brow slightly where as the D32 just stayed on the brow but with the concealer I want this slightly off the brow so I can blend with a buffing brush into the outer skin so this blends well. Once all applied I powdered down the brow and letting this set, ready to apply this again after repeating this part of the application with the last dusting of powder was ready to apply my base next using MAC face and body C1 and mixing with Mandy Gold foundation palette as I wanted a slight thicker coverage than what face and body would give and this look I have gone intentionally darker as I wanted to imply a really warm golden look with intense highlight and contour. So buffed the foundation mixed into the model's skin, and set this using Kroylan translucent powder. With the base applied I then used MAC shadowy and shadester to create the contour of the models face making this intense and to really set the cheek bones off using my morphe palette highlighter taking this along the blocked out brow, the hight of the cheekbone and the bridge of the nose.

The whole of the base completed adding the final touches to the face with applying my freehand lace to the models's face using Kroylan super colour palette using the black paint to apply as my lace, not really knowing what I wanted to apply I just went with the flow and letting the free hand take the way! and applying morphe palette shadow to the lid in a warm brown tone lightly dusting this over and finishing the eye with MAC mascara to the lashes to open the eye up! And applying a small amount of Vaseline to the lip.


Products used:

Skin prep: Simple Cleanser, toner and moisturiser 
Brows: Spirit gum, Kroylan translucent powder, derma palette D32
derma concealer palette D3, D4, D5 and D32, pro clean.
Foundation: Face and body C1 and Mandy Gold foundation palette 
Concealer: MAC NW25, NW35
Powder: Kroylan translucent powder
Contour: MAC shadowy and shadester contour palette
Highlighter: Morphe pallete
Shadow: Morphe palette
Lace: Super colour palette Kroylan paint paint
Lip: Vaseline 
Lashes: MAC mascara


Evaluation

For this look I really enjoyed applying the whole look from blocking the brows to free hand lace look. As much as I liked applying this look it could have improvement as I do like the look but I think I will apply and practice on myself  specially with the brow, but I do know where I went wrong for next time and that's not applying enough spirit gum and making sure I coated all the brow hair's and it shown in the image above at the beginning of the brow but I was happy with the middle to the outer brow.So this is something I would make sure I pay more attention too as he did have very thick and dark brows! For the lace work I felt it worked but next time would try something more like a masquerade laced mask look as I think these look so pretty! Main focus will be the brow though! and I will insert below images of the second attempt of the blocked out brow below and see if I can hit the nail on the head this time as they say practice makes perfect after all! 


Second attempt of the blocked brow


Products used:

Brows: Spirit gum, Kroylan translucent powder,Derma palette D32
Derma palette D5,D4
Foundation: MAC face and body C1
Powder: Kroylan translucent powder
Contour: MAC contour palette shadowy and shadester
Highlight: Morphe palette
Blush: Illamasqua cream blush rude
Lip: Illamasqua cream blush rude
Mascara: MAC mascara


Evaluation

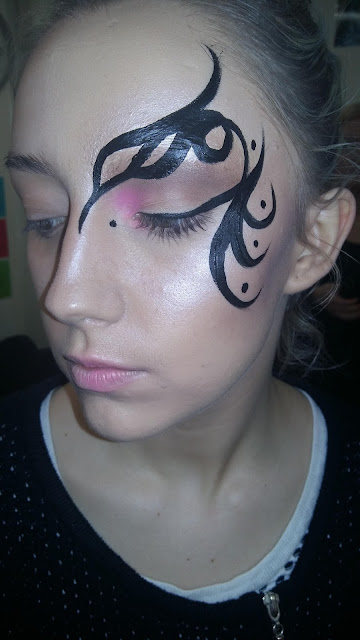
So for the second attempt I was happy with this outcome, I felt I applied the block brow well I worked into the area with more hair applying a bit more spirit gum. Just generally kept brushing in the wrong direction making sure I got into every hair so when I flattened the hair wouldn't still lift like the first attempt. Being very happy with the blocking stage  and the coverage takes me onto how much I loved my base and used MAC face and body! Face and body I tend to have a love hate relationship with most of the time I do hate it as I always find it doesn't really give me the coverage I like as I've quoted before it's like water on the skin! But this look I did really work it into the back of my hand and to apply I used a new brush I purchased from Amazon which is a set that's a cheaper version of real techniques brushes of the new range they have just brought out. To apply the face and body I used this new brush and loved it to really buff into the skin giving that flawless skin. And each image really did show beautiful skin, so today I was very happy for once with face and body. It really is how you warm it and work with it before you apply does really make a lot of difference!!
With the lace I kind of changed the idea of Masquerade and just really went with the flow! Creating a blow tree like image on one of the blocked out brows which I felt worked well!
Overall I was really happy with my second attempt and happy I gave this look a practice with the blocking of the brow and I really enjoyed this version to the wax! As I find it's easier to work this way and also gives such a cleaner finish and doesn't look as heavy as the theatre way! So second attempt was a success!


The brush I used to apply the face and body which, is now my favourite brush to apply bases at the moment as it buffs so beautiful into the skin with this brush and 6 brushes for 5 pound from Amazon can't go wrong as if it makes me like face and body again!





Sunday 14 February 2016

Demo: Blocking brows and incorporating lace

For this lesson Branka showed a beautiful high fashion look with blocking the brows and then putting her creative flare to the final look with with lace inspired look to take the eye away from the blocked out brow! So the aim was to to recreate this and be free hand with the brush and let of creative skills flow onto the face!

Starting with blocking the brow first Branka, applied spirit gum to her eye lash brush and wait about 20 seconds for this to go tacky once has waited for the spirit gum to go tacky she went into the brow but taking it through the wrong direction and coat them in this direction first with going right down to the base getting every single hair covered so that the hairs don't start to lift. In theatrical and period make up we was shown to brush the brows up against the skin but in fashion Branka is showing us by brushing the brows back into its normal direction to the side because if she brushes the brow up onto the skin it gives her more to hide and not giving such as a clean finish. To really flatten to the model skin she next used a spatula to press down the hairs, sometimes she uses her hands but finds it does become a bit messy so this technique does the job but also mess free!

Once flattened her brow with no hairs sticking up or out Branka then cleaned around the brow on the skin this is because it will create a shiny layer which you have three types of spirit gum them being:

HD spirit gum: HD spirit gum is clear and has no colour to it, is fantastic to use but Branka found is when it goes cold it goes white. And would have to take it off and re do it.

Standard spirit gum: This is the spirit gum we have in our kit and is most commonly used, which sticks really well but would suggest when getting a new spirit gum to leave the lid off for a day or so this will help for the spirit gum to apply better and dry quicker but the down fall of this spirit gum is it does dry shiny.

Matte spirit gum: This product is really good for wig lace work and theatre work as it has no shine to itself.

For this look Branka would normally use HD or standard spirit gum, Next Branka took a clean eye shadow brush and using some MME to clean up any excess that has gone onto the skin as she doesn't wait it to show up in the make up. MME is sprit gum remover which is very mild and oil based that is kind to the skin. Once Branka had cleaned up around the brow it was ready to set by using Ben Nye fair powder and pressing this all into the brow using a powder puff and then leaving this to set as Branka told us an important tip is time giving your self time to apply a good blocked out brow because if you dont give yourself time between each layer the hairs will start coming through and this will create more work for yourself so Branka likes to give at least a minute with each layer and likes to pack the powder on instead of using a brush to apply the powder likes to use a powder puff cause then you can really press this into your brow. Because when she applied her spirit gum and went in the wrong direction first this really coated the lashes so when she pressed the down they have all glue themselves to each other where as if you only spirit gummed the top layer you would find the brows would start to lift.

Now to start blocking the brow Branka applied D32 from the derma palette to the whole of the because when you have any dark undertones you need to neutralise them first before you go in with your concealer and if you dont do this first and skip this step will cause a big struggle for yourself to create this blocked out brow. Once applied D32 to the whole of the brow but only the brow not taking this onto the skin, then powdered the brow really pressing into the brow and once applied wait for a minute for this to set in. If Branka had a model with very dark eye brows after she had let that first layer set she would go back in with D32 again to really take the darkness out and then go in with her powder puff and press the powder into the D32 again.
After the D32 had set into the brow Branka started to warm up her concealer from the derma palette using D3,D7,D6,D2  warmed this up making sure is mixed well and warm as if it is stiff still when applied to the brow this will cause all the work underneath to lift and merge from the brow so is very important its mixed well and only applied to the brow of the D32.
To apply the concealer to the brow Branka used a flat eye shadow brush and worked from the outside, inwards and normally goes a little out than the normal brow once applied leaves to set a minute and goes in with a buffing brush blending this into the skin.Once finished blending Branka then powder this down and getting ready for the final layer.

Repeating again warming up the concealer colour and this time applying with a foundation brush and applying again just slightly around the brow so Branka has space for blending as you don't want to blend on top of the brow only around as on the brow you should only stipple colour on and not blend as this could move all the under layers. Then giving one more set of powder and then ready to go in with her foundation, for the foundation Branka used MAC face and body which is quite a light foundation because she went in thick with the brow it doesn't mean you have to go thick coverage with the skin once applied lightly dusted the face with powder and then went in with her contour using MAC sculpt with a fan brush and making this really strong once all contour applied went onto highlighting with a fluffy eye shadow brush using revolution the middle pink shimmer and applying to the brow and the cheekbone making this highlight intense like the contour giving a highly contrast look.
Next created her lace mask using black body paint from mehron and when mixng this Branka mixed it to a good custard consistency and then started with the liner going with a very extreme liner going from right in the corner and then straight out to the end of the lashes going in the style of masquerade/1920's not swirly but quite nice art noeavou movements and try's to do in one stroke, as if you keep stopping and going you will get jagged edges, once finished her lace would then apply mascara and that's her blocked brow lace work with a slight stain to the lip and slight colour to the eye to tie it all in!


Friday 12 February 2016

Hair: Ponytails incorporating Avant Garde updo's

Today's lesson was all about that perfect neat pony tail, which may I add is very hard!! And once I've applied the ponytail I will be using scrim which is a strong, coarse fabric that will act as like scaffolding to my Avant Garde hairstyle that I will be applying to my model's head.

Starting off with applying my ponytail first I applied a few sprays of water to the hair to help me get this back smooth and neat! Brushing all the hair through using my soft brush and then started from the forehead to the crown brushing all the way round the head using my left hand to hold the pony and I use my right hand to brush in the hair in and rotating round and getting this tight to the head as possible once I got my pony neat finally! Tied with a hair band as I tried with a elastic band first as I wanted it really tight but kept breaking so used the hair bands instead as they were more secure for my hair style I was about to create!


With my pony in place was time to start with getting creative with Avant Garde style! I wanted to create a style that showed texture and range within the style with using the fabric scrim to this will hold my style and become the frame to my work. First with creating a hollow circle and just applying to the top of the crown under the ponytail and then wrapping this round the scrim and covering with the models hair. Pinning the scrim to the models head making this secure.


Once I secured my scrim to the models head I made a small ball out of crepe hair this can be used as padding or use to apply beards and any other false facial hair you want to apply to the face so you can pretty much use it for a lot of things for make up and hair stylists. Taking a small amount of crepe hair and moulding this into a small ball and placing this in front of the pony to begin the different range of size and different textures.And adding crepe hair to the hollow circle filling out to add more texture to the style.


Next I made a bigger circle out of scrim and pinning this together to hold the circle together once all pinned and secured I then spread the crepe hair out over the the scrim making sure its covered but not completely. Once all applied I then pinned this to the back of the head making sure it was secure to the models head.


Evaluation

Really enjoyed this lesson as it was a chance for all us girls to get creative and think in the form of a fashion hairstylist. I applied a look that I had in my head and felt it really worked as I wanted to really apply the Avant Garde look but create texture within my look. I think the style I created some people would like and some wouldn't just cause it's different to your normal pretty carpet up do but as Avante Garde is totally the opposite and for that reason is my favourite hair styles as I love its big, bold and out there and just looks so creative which I love and love creating these hair styles!
If I was to change anything within my style maybe try without the crepe hair in the middle of the circle and also for the last circle instead of covering in crepe hair get the same colour of the models hair and wrapping this round instead! But overall I loved this style and feel it suits the whole concept of Avant  Garde. 


My Pat Mcgrath inspired look

So today was all about glitters and pigments and choosing an image we wanted to recreate of the work of the talented Pat Mcgrath so I choose the image that stood out to me the most and what I felt looked creative and wanted to create this myself with the image shown below this is the image I choose to create this lesson.


Fig 1- Mcgrath,P. (2006). fall2006. Available: https://www.pinterest.com/dammdamm4/pat-mcgrath/. Last accessed 07 feb 2016.


And for this lesson I actually took step by step which I normally do forget! so with each image I'm going to explain what I'm doing and why!


To start this look off I first cleansed and toned my models skin leaving the moisturising to after I've applied my Pat Mcgrath inspired eye, as the cleanse and toning the skin will take any make up off the face and any oils as the masking tape won't stick correctly and will tend to lift from the skin and wont give me the sharpe shape I want to create  in the style of Pat Mcgraths work. Once cleansed and toned the face I then applied masking tape in the similar shape but instead of doing both eyes I wanted to add my style to the image and just masked one eye and not both.


So once I applied the masking tape to the models face I applied as my Base MAC gel liner black track this was for a base for the glitter taking this around the the outer shape of the eye and bringing the liner the underneath of the brow and going thinner on the bridge of the nose and then bringing down to where the tape ends.


Next going in underneath the brow highlighting this area using Kroylan white liner in colour clown white taking this out to where the black liner end. With this highlighting the brow but also helping to enhance the shape and the sharpness of the black liner that is applied above the white liner and blended this into the brow bone blending this down so this will blend with the the black underneath what I will be applying next to the lid.


To complete the base of the lid I then went back in with MAC black track eye liner to the base of the lid and blending this into the white clown liner, and blending this black out winged like the the rest of the eye and when blending causes for the the colour to lighten so to get the black really black I just kept building the colour till I was happy! For the liner going back to using the Kroylan white clown liner taking this into the lash line and taking it straight out with the winged eye. this is to really highlight that eye amongst all the black.


With the eye really starting to come together I wanted to complete the blending of the eye as to me it would make the look unfinished so between the white clown on the brow and the black track on the lid in between I went in and blended out MAC electra shadow to finish that section of the eye.
And to finish the liner I took the white clown under the eye and winged this out to blend with the shadows.


Putting the final touches to the base for the glitter, applying black track under the eye and blended to give that smudge look under the eye as I didn't want to give that clean sharpe finish like the above on the eye. And wanted it similar to the inspired image of mcgraths work.


To finish the eye was the final touch of some sparkle! Using illamasqua pigment in colour android this being a black glitter based pigment to start helping reflect in the style of Pat Mcgraths work. Applying  on the black track under the bottom white clown liner to give a dusty pigmented daze under the eye. For the lid I then worked into the crease to really enhance the models socket line, as my black track was really holding the MAC black glitter I applied DUO eye lash glue with one of my flat brushes applying the glue into the socket line and then waiting a few moments for the lash glue to become tacky so the glitter applies better as if I applied when really wet I think it would make my glitter to become dull so waiting a few moments for it to become tacky it applies better and wont make my glitter dull but sparkle. Also applying the DUO glue to the top corner to apply more of the sparkle but I didn't want to apply too much as I'm sticking to the less is more!!


So finishing my Pat Mcgrath eye and cleaning up all that sparkle that dropped onto the cheek was ready to apply my base! I wanted a a really matte look with a slight contour into the cheekbone nothing too heavy as its all about the eye and the lip today! So because I didn't moisturise when I prepped the skin as I didn't want it to cause my masking tape to lift so that's why I left it till now applying the moisturiser to the skin making sure there's no dry parts as I want a matte finish and if any dryness is left this would show on camera! So while letting the moisturiser set into the skin I mixed my foundation using MAC full coverage mixing the colours NC15 and NC25 to get my models skin tone applying to my models chin making sure the colour matches my models neck. Blending and buffing into the skin and taking onto the models neck, after applying the base I concealed under the eye using my MAC medium concealer palette using NC30, NC25 mixed with some mid yellow tone. Mixing these colours together to mix the colour and apply under the eye buffing this in and making sure its well applied and then powdering under the eye using Kroylan translucent so this doesn't move or crease, And then powdering the rest of the face making sure its a matte look as I wanted. For the contour I went in with using MAC contour powders shadester and shadowy to slightly pick up my models cheekbone to give slight structure to the whole image its self.

Happy with my base, so was now time to recreate those lips! Using MAC black track only applying to the bow of the lip and then for the outer edges of the lip applied Kroylan white clown eye liner and powdered this down making it look matte and then MAC gloss to the black bowed lip to show a glossed shine! Finishing up the look with grooming the naked brow with MAC brow gel and then MAC mascara to both lashes to darker and complete my look.


Products used:

Masking tape
Cleanse, tone and moisturiser 

Eye: Mac black track eye liner, kroylan white liner clown white, 
MAC shadow electra, ILLAMASQUA pure pigment- android 
Base: MAC full coverage NC15, NC25 
Concealer: MAC medium concealer palette NC30, NC25, yellow mid tone
Powder: Kroylan translucent
Contour: MAC contour powder, shadester and shadowy
Lip: MAC black track and Kroylan white clown liner, MAC gloss
Brow: MAC brow gel 
Mascara: MAC mascara

Evaluation

I well and truly loved creating this make up! I really enjoyed applying this look and loved getting creative and adding glitter! I was really happy with my overall outcome I felt everything went smoothly and all the products I decided to use to apply worked really well.
The only thing I changed throughout the application is the white liner along the lash line and in the first picture of applying the white liner is winged out but I wasn't so keen! So to over come this I went over the winged area in black track and then illamasqua pure pigment so this would cause the liner to end at the end of the lash line.
If I was to to do this look again I would most definitely apply this to both eyes as I just think its a stunning make up and enjoyed applying this beautiful creative sparkle Pat Mcgrath inspired look!


Saturday 6 February 2016

Demo: Glitters and pigments inspired by Pat Mcgrath

The lesson today was all about being inspired by Pat Mcgrath's gorgeous glitter and pigment eye looks so in this demo holly showed us a quick look today missing out doing the full face and just showing us one eye so this gave us more time to get creative with those glitters and pigments!

Starting off with explaining to use about mixing mediums so we had more knowledge with what goes with what,

Eye liner mixing medium: Which is for the eyes you can use with glitters, pigments anything powdered or loose and kind of glue to the eyes or if you wanted to make into more of a creamy texture, this eye liner mixing medium is good for a long length of time in wearing the pigments and glitters and this will help keep them staying intact for a long period. Though holly finds when mixing the eye liner medium and glitter together tends to make the glitter become dull , so applying eye liner mixing medium to the eye then the glitter or pigments on top will make them not become dull.

Alcohol based mixing medium: The alcohol mixing medium isn't used for the face, if you was to use on the body it is quite drying.

Water based mixing medium: Is more for the face this could be added to a thick foundation mixing this together could make the the foundation into a liquid foundation.

Gel based mixing medium: which is best for body painting as its more comfortable as body paints can go quite dry but this tends to leave it with more of a satin finish.

Lash mixing medium: If you wanted to make a coloured mascara you could mix a coloured pigment and and the lash mixing medium together to make this colour mascara.

Once explain about different mixing mediums Holly began her demo for the glitter pigment eye, first made sure the models skin was clean and oil free as when she applies the masking tape to the face otherwise the tape wont stick properly though out the application of applying the make up and want this tape secure so it will leave a sharpe finish. So once applied the masking tape from the outside of the eye going up onto the temple. Next lightly applying vaseline everywhere Holly wanted it for the pigment and glitter to go so this will hold them but if applied too much vaseline will cause for all the eye to mush together and become dull.
First went in with a MAC gold pigment as the base as Holly tends to build the eye with gold and silver glitter, once applied her base then went in with a MAC gold glitter all the areas she wanted to apply the gold glitter on the lid of the eye and also taking onto the temple, then to add some depth into the socket used silver into the contour of the lid and taking this out onto to the temple and also a little to the brow. Once finished applying the glitter to the finish the look and get that Pat Mcgrath finish look to the make up Holly applied sequins to finish her Pat Mcgrath inspired glitter and pigment look.


( With Flash )


( Without flash )


Hair: Applying styles with switches

Switches

It's a hair piece that is attached with a elastic loop to make attaching to the natural hair easy. Switch hair pieces are used to create endless of gorgeous hair styles for up do's day to day or even for your special occasions if you want them for extra length or extra thickness or both!
They are normally made of crafted from realistic synthetic blends so they blend well with your natural hair!


So this lesson was all about applying switches to the hair to create more length giving us more hair to work with and create beautiful up do's! I created three styles with the switch making myself familiar with switches so I know how to apply and create an up do with them.

Plaited bun incorporating switch 

My first style I created was an up do bun incorporating the switch, first taking a small section of the hair making an anchor point this being a pin curl secured with two pins, I applied this so I had a secure point to attach my switch. Placing the loop onto the switch holding this into place and inserting pins through the loop into the anchor point gripping with two grips pushing them down wards once my switch was secure, brushed all the hair back making sure its all smooth and bump free and putting into a ponytail once applied the pony I sectioned the natural hair from the switch and plaited the switch and when I got to the end of the plait I tied together holding the plait, then from the start of the plait I started wrapping the plait round going the right direction and kept wrapping round till I had no plait left and pinning all in place with really fine grips. So still having the natural hair still left out I spilt into two plaited one section and placed this plait up alongside the right side of the bun going up round it and the doing this with the left side making sort of a plaited band to go round the plaited bun.


( Anchor point, did re do this as it needed to be more flat to the model's head )


( Plaited bun, incorporating a switch )


Two twisted plait 

For my second hair style incorporating the switch I decided to create a two twisted plait, first creating a middle parting and then sectioning the hair going from ear to ear keeping the front section separate from the back section. Brushing all of the back section back making smooth and bump free and then tying the back section into a pony tail at the bottom of the nape. This time to attach the switch I applied it to the hair band by putting a grip through the loop of the switch and pinning downwards through the hair band as I felt this was more secure than the anchor point. Once secured the switch I sectioned a small part of the natural hair from the pony and wrapped this round the hair band so the the hair band cant be seen and then pinned into place and secured. I then sectioned the pony into two sections and started plaiting like I would with a three sectioned plait and started to create my two section twist plait when getting to the end of the hair then tied to keep the style secure. After having all of the back section complete I then went back to the front section brushing the section and making sure its back to the middle parting and then combing each side and bringing back to pin and then wrapping any left over hair around with the rest of the hair wrap.


( Two twisted plait incorporating switch )


Two twisted plait converted into bun

So to create another style with the two twisted plait and this time created this into a bun by wrapping round the anchor point of this hair style and as I was wrapping I was pinning to keep the hair style secure once got to the end of the hair and placed the last pin then gave a light spray of hair spray just to give that extra hold to the hair.


( Twisted bun, incorporating switch )


Overall Evaluation

 After the lesson being on applying a switch creating nice up do's, and I think these are really handy as not everyone has long thick hair so these are really useful! I found attaching the switch to a pin curl anchor point wasn't very secure where as applying through the loop and into the hair band with grips was more of a secure option so if I was to ever apply this again I would know for future reference what works for me and what doesn't! And would use a colour matched switch not a totally different colour but due to the colleges selection of colours had to stick with this once but didn't work too bad but next time would use the right colour of the hair. Overall I did like working with these hair pieces and think they are great to add to a beautiful up do!


Friday 5 February 2016

Black and white editorial by me

Once we was shown the demo was our turn to create the look, looking forward to applying this editorial look as I think this it's a breath taking look when applied well looks stunning on camera!
I wanted to make sure my models skin was well and truly prepped because if there is any dryness this will show the texture in the black and white image. Cleansing the skin followed by a toner and then on to moisturising the skin giving this a few minutes to soak into the skin then applied illamasqua hydra veil this will also knock out any dry skin making sure my skin will be ready for my base application.
Starting with the eyes first I primed the eye first using the BALM primer this helps keep the shadow in place and helps the pigment of the shadow really come out, once I had primed both eyes I applied the natural eye first using MAC embark shadow pressing it into the lid using an oval brush and then buffing and then blending it out with my blending brush once all blended out for the highlighter I used MUA highlighter colour light buffing into the brow bone. Finishing the natural eye with with a small amount of MAC mascara just to open the eyes and add some definition.

Moving onto the black and white eye, with my eye already primed pressing into the lid with my oval shaped brush applying MAC carbon shadow once all pressed and applied to the lid and then blended this out and took it into the corner of the nose giving that high fashioned look once all buffed and blended out using a fluffy blending brush I buffed in MAC brule shadow to the brow bone and then to soften this then blended this out. To create a contrast look to the eye using MAC white acrylic liner as the eye liner but instead of taking the liner right into the corner of the eye I started from the middle of the eye and winging my liner out, creating a bit of fall out and as I really blended the shadow out onto the height of the cheekbone I cleaned this up using a make up wipe putting over my finger cleaning up underneath and then bringing up towards the top of the cheekbone making a sharpe winged eye, finishing with applying the MAC mascara opening the eye more, for the brows I wanted to keep natural so just brushed through MAC brow gel and brushed up the hairs at the begin of the brows to give a high fashion feel.

Now the eyes are applied and my moisturiser and hydra veil has set into the skin to give extra gloss look to my base I applied MAC strobe cream to the face before I applied to the base once all applied ready for my base I mixed up MAC full coverage NC15, NC25 and MAC strobe cream together as full cover is quite a thick consistency and I wanted a full coverage look but a natural look still and added strobe to make more of a liquid consistency and also add a shimmer glow to my base. Applied all over my models skin and just powdering the T-zone section with Kroylan translucent powder giving this a natural look. Highlighting the natural side of the face with vaseline to the cheekbone and the bow of the lip so it will be more of a natural highlight on camera for the white and black shadowed side I wanted a more contoured look so lightly contouring the forehead with my contour colour MAC shadester and into the cheek bone and then lightly dusting the jaw line. The to add depth into the cheek bone using MAC shadowy contour powder. For the highlighter on this side I choose to use a cream MUA highlighter colour light this is a shimmered highlight rather than the vaseline giving a natural highlight and implying a dewy skin!


Natural side


( Natural without flash )


( Natural in black and white )

Heavier side


( White liner )


( Mirrored image in black and white )


( Face on showing both sides heavier side on left, natural side on the right )

Products used:

Skin care: Simple cleanser, toner, moisturiser 
Extra prepping the skin: Illamasqua hydra veil, MAC strobe cream
Base: MAC full coverage NC15, NC25 mixed with MAC strobe cream
Eyes natural side: The BALM primer, MAC shadow embark
Brow bone: MUA highlighter colour light
Eyes heavier side: The BALM primer, MAC carbon shadow 
Brow bone: MAC brule shadow
Liner: MAC white acrylic liner
Brows: MAC brow gel 
Natural side highlighter: Vaseline
Heavier side highlighter: MUA colour light 
Powder: Kroylan translucent powder
Heavier side contour: MAC shadester, shadowy
Mascara: MAC mascara 
Lips: Vaseline

Evaluation

For this lesson I really enjoyed applying this look and seeing the finished result in black and white on camera made it look stunning really fresh and high fashioned with the natural side if I was to do this again I would of kept it rounded up on the lid as I blended it out quite a bit and when you see it on the image it makes the eye seem as its drooping down when I ideally want the eye to look lifted and awake not drooping! so that would defiantly something I would change next time and maybe add a slight more vaseline to pick the highlight up a bit more.
The heavier side I really like the contour in the black and white mirrored image as I feel it really shows off the cheekbones in the image, the change I would make is just really being more creative next time with the eye as I done similar to the demo that Holly demonstrated but I really liked my overall outcome and really enjoyed applying this whole look.   


Demo: Black and White editorial

So for this lesson we had an amazing cover teacher called Holly who also works in the industry and helped the skills following while Branka was away. And holly demonstrated to us all this lesson a black and white editorial with a natural side and then an creative eye side.

Natural side

Firstly making sure that the models face was clean of any make up and prepped ready before she applied any make up as if this isn't done it can ruin your application. First cleansed the face making sure she's working with a clean canvas, next onto moisturising the skin taking away any dryness because in black and white images this will show up the dry texture in your image so once all applied Holly then applied MAC strobe to the face with a foundation brush making sure this is all spread out evenly applying this will help give that dewy skin even more a glow as strobe cream holds a shimmer in its self so this will help give that glow through the foundation! For the foundation she used Bourjouis healthy mix that gives more of a dewy finish which is a great base to use for this look and you can even add strobe to your foundation to give that extra dewy finish ! Buffed all into the models skin making sure all areas are applied and going in with MAC medium concealer palette taking out any darkness under the eyes or any blemishes that are coming through the base, once Holly was happy with her base she lightly powdered with translucent powder in the T-zone area only as she wanted to keep rest of the face powder free as she wanted to keep the skin looking dewy for camera and wanting the cheekbones to really shine out on camera she applied vaseline with her ring finger to the areas she wanted to highlight and give a glossy look so when she takes a picture it will capture those highlighted areas just how she wanted them! For the natural look in black and white contour isn't really needed as highlighting with the vaseline this will bring everything out with a natural look to it.

For the eye Holly applied MAC omega all over the lid and then applied vaseline to give the gloss glow! finishing this natural look with small amount of mascara but just enough so it gives the lashes definition and then vaseline top the lip for final touches!


                                                                    ( Without flash )

( With flash )


Heavier side

The skin had already been prepped and the foundation has been buffed into the skin so Holly went straight on with eyes with this eye being a bit more creative rather than the natural side, she applied black all over the lid and to ensure the black was applied to whole of the lid she buffed the shadow into the lid making sure was well blended and winged the shadow up to bring the eye up using MAC carbon to blend out the shadow with  buffering brush with adding a small amount of MAC brule so that the black blends out to nothing. Leaving the brow bone without shadow on it and started with contouring the skin with MAC sculpt pro powder applying a small amount around the hair line and jaw line then going into the deepest part of the of the cheekbones to add depth and then taking Charlotte Tilbury film start bronze and go on the cheekbone finishing with the highlighting the features with MAC silver dust to create more of an intense highlight to the brow bone, cheekbone, bridge of the nose and bow of the lip. To add contrast to the make up Holly applied MAC white acrylic as a liner to the models eye as it's high pigmented product and so she used this to create her winged liner.

( Black and White )


Thursday 4 February 2016

Hair: Part 2 of the lesson applying more plaits

So after applying my French pleat and there still being time in the lesson and practice on my skills I had a play around with applying a waterfall braid to start can be a bit fiddly but once you start it then comes to a flow starting off by taking three sections at the side of the models head starting to plait starting the first section and then dropping a piece that will drop under and then carrying on the plait and then dropping the piece that will go under and just keep applying this till you want to finish your waterfall braid. I didn't actually curl the hair even though does show a lovely wave but you can curl the ends and I think this would be a beautiful look for a prom as I think its a very pretty look reminds me of a summer look with the waterfall braid and pretty waves.


Next  I applied another plait underneath the water fall using the hair that dropped from the waterfall plait, with this plait I didn't create another waterfall braid but I plaited against the head taking this to where the waterfall braid ends and then pinned into place and then making this into an up do by taking sections and creating a swirl effect starting from taking sections from the bottom rolling round my finger half way up the hair and putting into place and then pinning and taking random sections to show a random effect so it doesn't look to uniform styled once I applied all the back section of the hair and started to work with sections towards the front of the hair and then swooped the fringe in.


Evaluation

If I was to recreate these styles again I would definitely add curls to the styles specially with the first image the water fall braid as it would add to the pretty hair style. With the next image I'd also add curls before the hair was styled up so this gives more body and texture to the style, but overall I was really happy with the looks !


Hair: Part 1 French pleat

For this lesson Emma demonstrated a French pleat to us that would suit the red carpet showing a beautiful elegant look, with back combing the hair all out this will give volume to the hair and body making it easier for the style to stay in place. Combing all the right side round to the centre of the back of the head smoothing this out and pinning about 4 grips to hold this in place and then brushing and smoothing the other side out, bringing in the section towards the gripped centre and rolling this and then turning upside which this will create the roll and holding this in place start to pin to make secure and finishing off making the fringe fancy smoothing over and applying the ends to blend in with top of the pleat.

( Stylist Emma Coombs )

So after seeing the demo by Emma was our turn to apply this style I sectioned my fringe out as I wanted to add this in to the style near the end of styling the hair and then went onto back combing all the models hair which this will help give body and volume and also keeping my style together. Once I had back combed the hair I combed round all the right side of the hair making sure I've smoothed out and bringing this to the centre of the back of the models head to keep this in place I gripped in a line leading from the nape up towards the crown applying about four grips so that this will stay intact.
Now for the fiddly part,  smoothing out my back combed left side of the head leaving the front out still so this can add to the final style so smoothing out so the back combing isn't on show and brushing the hair round bringing it to the centre of the back of the head and then wrapping the hair round my two fingers and then turning this upside down and pining in place joining into the other grips I placed to keep this all in place.

Once all pinned and secured I brushed the front of the models hair making sure was all smoothed out and ready to style going into the top of the French pleat, taking this over brushing and smoothing over top of the head taking to the left side and then taking into a swirl of the direction of the top of my French pleat I created, using my very fine pins to insert to making sure they cant be seen but hold the front of the hair well into the French pleat and then light sprayed with hair spray to fix and to hold giving that final touch.


Evaluation

For this up do it did take me a few attempts as I did at first a little fiddly to begin with creating the pleat but after I got the hang of it it did get easier with turning the pleat and as it kept going too loose but after keep trying I got my French pleat! If I was to attempt this style again I would maybe make the front of the hair more styled and maybe while applying the pleat have the front of the hair kept in heated rollers so when I've applied the pleat take my rollers out brush out the curls so it will create a nice wave to work with! giving a nice gorgeous up do.