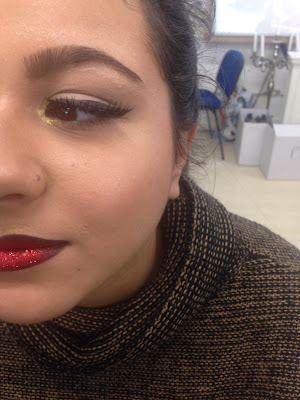
Branka as always firstly preppped her models skin making it was a clean canvas to work onto too and making sure there was no dryness on the skin that could interfere with her application.
Getting her foundation ready mixing YSL medium and dark together finding was a tone too dark so added more of medium to get the models tone once got the right tone applied to models face buffing and blending well into the skin and making sure blended down into the neck and very lightly dusted prep and prime over the face. Starting next with the eyes applying a light layer of brula to the whole lid and taking brun blended into the socket line and buffering this out just giving slight definition to the eye following the liner to the eye taking her eye liner onto a spactular preventing from her product drying up quickly, taking a small liner brush with her eye liner gel on getting the model to close her eye and applying this to centre of the eye taking it to the outer eye then adding some more product pressing at down on the line on the outer eye and gradually bringing the brush off the face this will create a perfect flick, then to apply the liner onto the inner eye getting her model to look down and looking to the outer corner this is to make applying to inner/ corner of the eye a lot easier!For the lip to give a balanced lip, this is very important for camera as if you don't balance the lip for camera this will show up and having an unbalanced lip will ruin the whole image so this was the main aim of the lessons getting a strong balanced lip!
Branka firstly mapped out the centre of the lip the top and bottom with MAC liner ruby woo
Above showing images of the lip mapped out before applying to the whole lip doing this is helps to balance the top lip to the bottom, once done so applied Ruby roo lipstick to the lip also to compliment the lip used a gold pigment applied to the bow of the lip and trhe corner of the eye nothing too much just to give that hint of highlight.
Followed onto an ombre lip out lining the lip with MAC black eye liner mapping the lip as done previous with the red lip, then pulling the colour into the lip making it fade into the lip that gives the ombre look.
To finish the final look applying glitter to the lip, this lesson has shown us how to build a lip not take away each time you apply but build your lip as Branka shown us applying a red lip following into an ombre and finally a glitter lip but not once did she take any of the product off just applied what would work! Its helpful to us student to see because its great to know on set of photoshoot if you need to quickly change your look within 5 minutes.
Final look


No comments:
Post a Comment