Monday 30 November 2015

Simple liner and creative lip by me ..

The main aim for my final look today was to apply a simple liner and creating creative lip by building from the original red lip developing into a ombre finishing with a glitter lip.
Starting off prepping the models skin cleansing first then went onto moisturising the skin I found with my models skin she suffers with patches of dry skin under the cheek bone area mentioning past make up applications with other artists in the class found when applying foundation and then setting the skin tends to stick to these certain areas causing to ruin the base. So wanting to over come this for my make up look I did concentrate more on these areas applying the moisturiser with a buffing brush really buffing into the skin. As today I didn't have my face oil in my kit that would normally lock the moisture into the skin, so instead I used illamasqua hydra veil over the face applied with foundation brush which I feel works great for dry skin and gives an all over velvet feel and really helped the dry patches so when I go in with foundation and then set will be a perfect base.

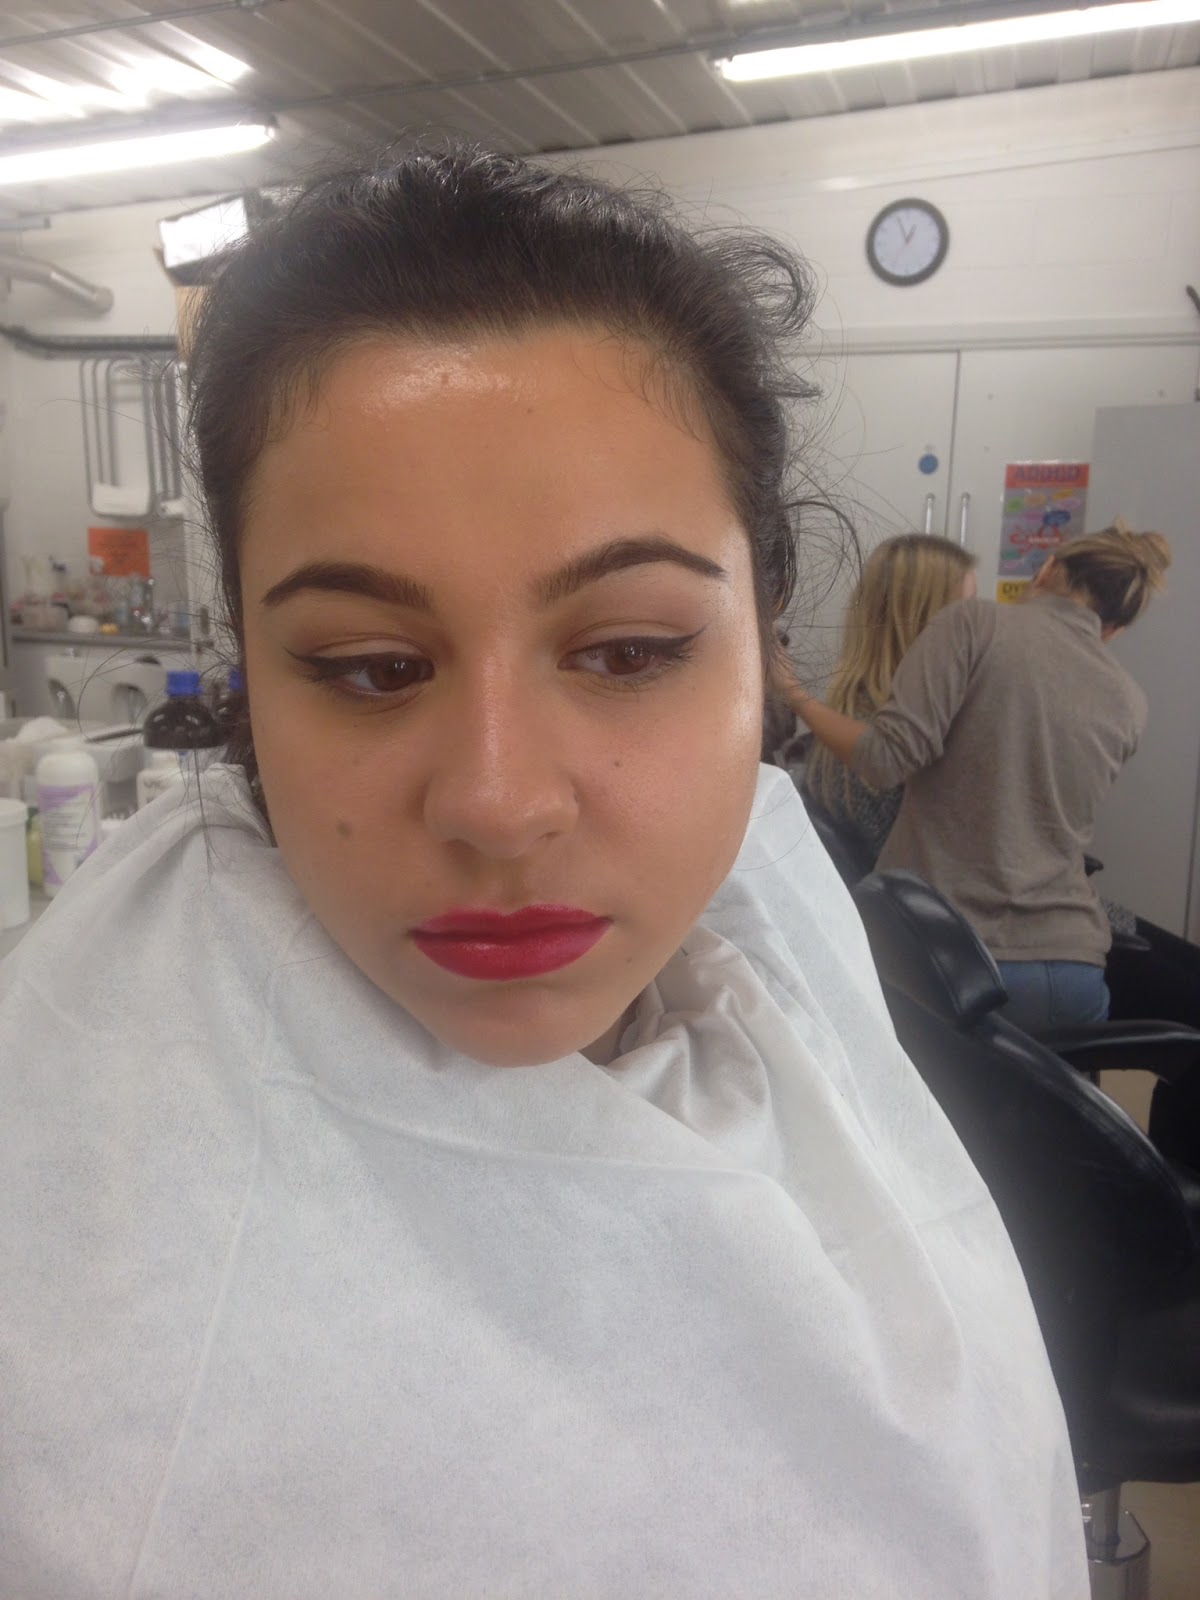
For my foundation I used MAC face and body as I didn't want a heavy look but just balance out the colouring of the face to match the neck, so I used a straight C1 that works great for her skin tone as its exact match! Set the base with Ben nye fair literally just dusted over the face again nothing too heavy!
Once finishing the base I moved onto applying the liner feeling a bit nervous as I needed to get both eyes the same but relaxing and not thinking about it too much and going with the flow I used MAC black track liner which I've decided I'm not too keen on using as its not black, black and had to build the liner to get a bolder black. Starting at the centre of the and bringing the liner to the outer of the eye not applying this in one stroke as this would cause me to shake and most definitely mess the liner up but apply in small brush strokes making this easier for myself taking the to the end of the lash line and to create the flick I added more product to my liner brush lightly pushing down on end of the lash line and flicking out my liner lightly taking my brush off the skin finishing with mascara brushed through the lashes and taking MAC brow gel throw the brows and just filling out with a little colour not much using a dark brown through the brow.
Finishing the liner on both eyes I blended MAC cork into the socket line as I wanted to lightly define the socket line giving slight depth making this giving definition to the eye area.
Onto the lip I did feel quite nervous I don't normally as I just naturally go onto applying the lip in any make up treatment but in this look I concentrated so much on the lip first mapping out with MAC lip liner Ruby roo, balancing the top lip to the bottom after taking me such quite a while as I was concentrating on this area as the aim was to get a perfect balanced lip but more I was concentrating on this area the more I felt, I kept messing it up. Finally felt I got a better mapping of the lip I applied Russian red to the lip and to and finishing touch using MAC vanilla pigment to the bridge of the nose and the height of the cheekbone just to bring those elements forward a little.


After completing my red lip look followed onto the ombre look using MAC black lip liner mapping the lip like before but when applying this I did take longer as I felt I did go bigger on the the lip which i shoudnt of done so this did slow me down as I needed to clean this up and go in again with the ombre lip, and then because I used face and body and I didn't matte the skin loads I found it was working on a very slippery surface and this did show a messy application I felt so this did slow me down cleaning this up too and I will be mentioning all this in my evaluation of what I will do next time to prevent this from reoccurring again in my work. So below I have inserted my ombre lip but due to me spending so much time on the lip I didn't get round to applying glitter to the lip nor the lashes as I did run out of time.


Products used:

                                                           Base: C1 MAC face and body                                                        
Powder: Ben Nye fair
Eye Liner: MAC black track
Eyes: MAC cork ( socket line )
Mascara: MAC
Brow: MAC brow gel, MAC brun shadow 
Lip: MAC Russian red
Lip liner: Ruby roo, Black eye liner
Highlight: MAC vanilla pigment

Evaluation

Throughout this application I was putting so much concentration as I was trying my hardest to apply a perfect liner and lip especially the lip making sure its balanced. I did really enjoy applying this look as I think its a gorgeous look to wear but I did how ever concentrate so much trying to get the balanced lip but I found the more I was concentrating the more I was messing up as in recent make up lessons I just do it naturally without thinking into it too much and do a nice lip but I did find today was more of a challenge for myself as today I tended to keep going bigger than the lip which did cause a bit of mess and I did keep cleaning this up! Also found where I didn't set the foundation loads the skin seemed so oily as I did use face and body which is a very oil based foundation and when I applied the lip liner and I went slightly bigger than the lip and felt like it was applying to water. So when I do create this look again which I most definitely will as I love this look, I would set more round the mouth make it more matte as I would like to over come this and no repeat! And maybe not concentrating so much and going with the flow and hopefully will get in what I missed as I only done half ombre lip, no glitter lip and no lashes so next time I would really have to get my speed up!  


Demo: Simple liner with creative lip

For today's demo Branka showed the class how to create a simple liner and a perfect balanced lip developed into an ombre lip finishing into a glitter lip.
Branka as always firstly preppped her models skin making it was a clean canvas to work onto too and making sure there was no dryness on the skin that could interfere with her application.
Getting her foundation ready mixing YSL medium and dark together finding was a tone too dark so added more of medium to get the models tone once got the right tone applied to models face buffing and blending well into the skin and making sure blended down into the neck and very lightly dusted prep and prime over the face. Starting next with the eyes applying a light layer of brula to the whole lid and taking brun blended into the socket line and buffering this out just giving slight definition to the eye following the liner to the eye taking her eye liner onto a spactular preventing from her product drying up quickly, taking a small liner brush with her eye liner gel on  getting the model to close her eye and applying this to centre of the eye taking it to the outer eye then adding some more product pressing at down on the line on the outer eye and gradually bringing the brush off the face this will create a perfect flick, then to apply the liner onto the inner eye getting her model to look down and looking to the outer corner this is to make applying to inner/ corner of the eye a lot easier!For the lip to give a balanced lip, this is very important for camera as if you don't balance the lip for camera this will show up and having an unbalanced lip will ruin the whole image so this was the main aim of the lessons getting a strong balanced lip!
Branka firstly mapped out the centre of the lip the top and bottom with MAC liner ruby woo 


Above showing images of  the lip mapped out before applying to the whole lip doing this is helps to balance the top lip to the bottom, once done so applied Ruby roo lipstick to the lip also to compliment the lip used a gold pigment applied to the bow of the lip and trhe corner of the eye nothing too much just to give that hint of highlight.


Followed onto an ombre lip out lining the lip with MAC black eye liner mapping the lip as done previous with the red lip, then pulling the colour into the lip making it fade into the lip that gives the ombre look.


To finish the final look applying glitter to the lip, this lesson has shown us how to build a lip not take away each time you apply but build your lip as Branka shown us applying a red lip following into an ombre and finally a glitter lip but not once did she take any of the product off just applied what would work! Its helpful to us student to see because its great to know on set of photoshoot if you need to quickly change your look within 5 minutes.


Final look


Friday 27 November 2015

Fashion hair : Heated rollers

This week Emma demonstrated to us how to apply a brick set with heated rollers, basically same as last week how we applied the rollers but instead of applying to wet hair and using the portable dryer, we will be applying to dry hair and just dampening down with setting spray not getting the hair wet just 2 sprays on each section to help when rolling the hair and letting the heated rollers create curl and bounce ready for us to dress out into style.

Firstly making sure our heated rollers were turned on so throughout our demo they would be heating up ready for us to apply doing this giving time for your rollers to heat up will cause them to be hotter which will create more curl and bounce to your set even though they are really hot to work with which I've noticed has helped me put in rollers a lot quicker as the heat makes you work quicker not wanting to burn your fingers!!

To start I combed through my block's hair starting from the bottom working up the hair making sure there are no knots and doing this is so I get rid of any knots as if I was to start from the top I would be creating a be knot at the bottom of the hair for myself to battle with so this way helps get rid of knots and not causing any damage to the hair working upwards.Once all combed I side parted my blocks hair making the left side of the head more of a heavy feel so when my set is taken out and and dressed out that side should be giving more volume and bounce!
Starting from the front sectioning my hair from ear to ear making sure each section isn't more width than the roller or length as previous roller sets as I've created before will cause over hang of the roller, also making sure my sections are neat and straight once got a correct section I combed through holding tension on the hair holding at a 45 degrees angle really making sure I have tension as its will show in your set as I want this tight and rolled straight up to the root of the head, while doing this I gave the section 2 sprays of setting spray this helps me to keep the tension as if was soft and no setting spray added I would most definitely find putting the roller in hard as end of the hair is a lot thinner and trying to grip the hair to the roller just always seems to slip through so spraying the ends I found really helped me to start my roll off and used my tail comb throughout making sure all the ends were kept in and preventing any fish hooks! After sectioning and setting my whole front of the block I went onto setting back of the hair into a brick set doing this as I don't want a uniform set which is sets going in straight rows all one after another where as a brick set is more movement in the set which is more like a brick wall and will give more movement when you take it out. When I had applied all my set I waited till all rollers had gone cold because if I was to take them out when still warm this would cause my set to drop! So once had all gone cold starting from the bottom of the head taking out my rollers working up the head to the front sections, cause if I was to start from the front and work my way down the head I would constantly be lifting up hair to take out the roll underneath so this does make more sense to undress the hair this way! Now all of my rollers are out i brushed through the block using a denman brushing and smoothing out and started using my silver clips to keep all waves in place and then setting the hair with hairspray.


Final image


Evaluation

All throughout this set I felt more confident as we have been doing a few sets now as we currently are also doing in out period hair which has most definitely help me speed up and my sections are becoming neater , and one thing I was finding very hard at the start was keeping the tail comb in my hand all throughout the set and whipping it round to use on each section keeping the ends in trying not to create any of those fish hooks! Practice does make perfect, my sets are most definitely not perfect yet but one day they will be! As I've already seen so much improvement in my work and tend to carry on practising my sets making them perfect! I was really happy with my whole set but with my final image when I dressed out and silver clipped my waves into place  but as you can see above it didn't really enhance them at all but this was due to not being left in long enough I felt so if I was to create this again I would have left them in longer with more hairspray also make my style more neater as you can see that style isn't ready for camera as you can see fly away hairs coming away from the hair so to over come this next time maybe use a hair serum and shine spray to finish the look completely. 

Monday 23 November 2015

The Creative Lip


Classic smoky eye

First cleansed my models skin, applied oil and for the moisturiser instead of just applying the moisturiser to the models face like I normally would with a pad or my fingers I used foundation brush getting this to soften the brush ready for the foundation as I will be using full coverage and find this foundation quite hard to buff into the skin as I find it quite an tough foundation to work into the skin so knowing this tip will hopefully help me work the foundation into the skin easier and hopefully come to terms with using this product as I'm not such a fan of full coverage for this reason!

Starting with the eyes first taking MAC black track eye liner onto a spectacular the reason being for me working from the spectacular is because if I was to work off my hand the gel liner would tend to dry up so working from this instead wont dry up so much and wont loose product.
Applying liner taking the liner up to the crease and no higher once applied liner all on the lid working into the lash line lifting the brow to get right into the lash line I then applied to the water line and using a cotton bud to soften the underneath to take away any harshness and gives more of a smoky look!
To really darken the black liner on top of the eye I placed carbon on the lid pressing this into lid building this colour making it more black than black but not taking this any higher than the crease, blending brul onto the brow bone using a fluffy blending brush for the eyes as I didn't want this to be bold on the eye but just to slightly bring the brow bone forward following onto blending cork into the crease once done blended the final colour bringing this slightly lower using the colour brun all from the MAC shadow palette reason being for me adding these and blending them out above the black is because I think its always nice to have your blend out colours as it shows depth to the eye look and shows dark to light from you lid up wards towards the brow giving a nice finish. Repeating this but on the lower lash line layering the colours first applied cork then brun and final colour carbon which I buffed out on top making them smokey, to finish the eyes I applied mascara to give the finishing touch to the smokes.
For the base I used MAC full coverage highlighted using NC15 everywhere of the face I wanted to bring forward for the contour colour I used NW25 this was to put depth into areas I wanted to create depth on my models face what will also help the highlighted areas bring forward more, I started working into the highlight first and set lightly as I wanted a dewey look. Then worked the contour colour by buffing into the skin.
Once highlighting and contouring my model and making sure all blended and buffed into her skin, this being important its worked into the skin well as contour if not blended well can look dirty and not contoured so is always important this section it worked in well within the face. Following on defining the brow's combing through MAC clear gel and worked tope into them with a flat brush and lightly buffed the brows up doing this making them look on point framing the face well.
Going back to the eyes to make these really dark I worked carbon into the back of my hand so this wont cause any drop out when working back onto the lid and taking it under the eye using her pencil brush and used tope on top to soften out then buffing in brul finishing the the lower line.
Back to carbon again to work into the lash line lifting the brow to press the pigment into the lid really building this colour to make it bold, finishing the eye applying mascara through the lashes.

Finishing the skin I applied rimmel bronze light/medium applying to where the sun would naturally hit the face but not applying heavy just lightly to the face to give a warmth feel to the face. For the lip I created a nude lip so used naked lip liner to outline the lip and then for the lipstick mixed a tiny bit of plum to the foundation and mixed what gave a nude colour applied to the lip adding gloss on top, so we applying the lip but nothing bright or too much as we are making it all about the eyes! And you should always make it about either the eyes or the lip never too much going on otherwise you don't know where to look giving you no focus point.
And for final touches used vanilla pigment MAC to the highlighted areas applied with a fluffy brush really making those cheekbones stand out and look on point for camera!

                                     Classic smoky eye


Above is my final image of the classic smoky eye, next to vamp it up a little....

                                       Glossy smoky eye

To vamp the classic smoke giving that high fashion feel I applied Vaseline to my models lids with my ring finger taking this over the lid only taking this up to the crease and no higher like done previous with the black track liner giving the carbon a really gloss shine. Giving extra gloss to the skin I also applied down the bridge of the nose and the highlight of the cheekbone. Finishing the vamp look I applied MAC plum to the lip to change the lip tone from nude to a darker and deeper tone to really vamp this look up.


                                            Products used:
                                                               
                                                           
Base: Highlight- NC15 Contour- NW25
               Eyes: Lid- Carbon, Crease- Cork, Below Crease- Brun   Brows: brow gel MAC, shadow- Tope
Powder: Ben Nye- Fair
Extra Contour: Rimmel bronzing powder light/medium
Lips: First lip- Nude MAC liner with added plum MAC lipstick + gloss applied. Second lip- MAC plum
Mascara: MAC
Final touches: Vaseline

Evaluation

So the aim for this lesson was to create a classic smoky look the developing into a more vamp glossy look! When applying the gel liner to the models lid, like Branka had done I should of then quickly blended this out as you have to work with the product quick as it dry quick but I did forget this and instead of blending this out I actually went straight in on top with my carbon pressing this into lid and then buffing the shadow and the liner both out together, me then thinking why isn't this blending out properly then straight away I clicked I had missed that step out! I wouldn't say it effected my final look as I'm really happy with my eyes but it did take me longer to blend out making sure they didn't look so blunt but a good blend but because the liner did dry it was a lot harder t buff out than if I hadn't of missed that important step out, next time working with it quick so its not making more work for myself than needed! I feel I really done well with this look and was really happy with the final outcome and think it really shows a high fashion image! Out of the two images classic and glossy smoke my favourite outcome was the glossy look everything just comes out at you more and in both photographs its the image that catches my eye the most and I just love the final outcome! If I was to re-create this look I would make sure I don't forget the important step! So that I do get my application done in 30 minutes and don't take so long on the eyes!

Practice of the smokes


Thursday 19 November 2015

Demo: Smoky eye/ glossy smoke

For this lesson Branka showed us how do create a classic smoky eye developed into a glossy smoked look with strong contoured base.
She first cleansed her models skin, applied oil and for the moisturizer instead of just applying the moisturizer to the models face with her fingers she used her foundation brush getting this to soften the brush ready for the foundation as she will be using full coverage to straight out contour and highlight with and buff into the skin no base underneath and full cover rage can be quite hard to buff out I think so this is a real good tip to know!
Starting with the eyes first taking MAC black track eye liner onto a spectacular the reason being for Branka working from the spectacular is because if she was to work off her hand the gel liner would tend to dry up so working from this instead wont dry up so much and wont loose product.
Applying liner with an synthetic brush taking the liner up to the crease and no higher once applied liner all on the lid working into the lash line lifting the brow to get right into the lash line then quite fast she blended out the liner as this dry's quick so she had to work quick with it, also applying to the water line and using a cotton bud to soften the underneath.
To really darker the black liner on top of the eye placing carbon on the lid building this colour making it more black than black but not taking this any higher than the crease, blending brul onto the brow bone following onto blending cork into the crease once done so she blended her final colour bringing this slightly lower using the colour brun all from the MAC shadow palette.
For the base she used MAC full coverage highlighted using NC15 everywhere she wanted parts of the face to bring forward next her middle tone using NW25 NC15 mixed, leaving a gap for the contour using NW35 once all applied to the skin she started working into the highlight first and then set lightly as she wanted a dewey look. Next worked into the middle tone following the contour.
Next step defining the brow combing through MAC clear gel and worked tope into them with a flat brush and lightly buffed the brows up.
Going back to the eyes to make these really dark she worked carbon into the back of her hand so this wont cause any drop out when working back onto the lid and taking it under the eye using her pencil brush and used topee on top to soften out then buffing in brul finishing the the lower line.
Back to carbon again to work into the lash line lifting the brow to press the pigment into the lid really building this colour to make it bold. finishing the eye applying mascara through the lashes.

Finishing the skin Branka applied YSL bronze number 2 applying to where the sun would naturally hit the face but not applying heavy just lightly to the face to give a warmth feel to the face. For the lip she wanted a nude lip so used naked lip liner to outline the lip and then for the lipstick mixed a tiny bit of plum to the foundation and mixed what gave a nude colour applied to the lip adding gloss on top.
And for final touches used Ben Nye shimmer to the highlighted areas applied with a fluffy brush really making those cheekbones stand out!!


The final look

For the final look I loved it! I think its a beautiful look for camera, cat walk anything in fashion! And next Branka shows us how to vamp this look....


Final vamp version

To vamp this look Branka firstly used Vaseline applying this to the models lid with her ring finger dappling all over the lid giving that beautiful gloss effect! To give that extra glowing gloss look to the face she lightly applied with her ring finger with Vaseline again to top of the cheekbone taking it up lightly above the brow and also applying to bridge of the nose this is go just give that extra dewey-ness! For the lip outlined the lip with MAC liner plum , filling the lip with the liner as this will prolong the lipstick wear. Finally applying lip with MAC lipstick plum, Branka changed her classic smoky look to this beautiful vamp look literally in 5 minutes which is a great tip to know!


Sunday 15 November 2015

Straight blow dry by me ...

Firstly putting a towel around my models neck preventing her getting wet, once I tucked this in around the neck getting my basin in position asking my model to learn back , asking if its comfortable for her. When so started getting the right temperature making it warm so it doesn't burn my model or too cold for her when getting the right temperature running the water through her hair at the top of the head cupping my hand and pulling down the head so the water doesn't go in her eyes repeating this around the ears, getting the whole head wet ready to apply shampoo to the head massaging into the head bringing it down to the tail of the hair rinsing the first application of shampoo once all rinsed I repeated the shampooing again making sure my models hair was clean.
For conditioning the hair I applied to the ends of the hair and the remainder I massage into the head doing this for a few minutes giving time for the conditioner to moisture the hair.
Starting to rinse the conditioner from the hair making sure all is rinsed from the hair to know when the hair is all rinsed properly when the water runs clear from the hair and no bubbles.
Ringing the tail of the hair getting my model to lean forward, wrapping the towel round her head taking her to the work station making sure the chair is low this is so I can style the hair easier as if she was sat at a height would be difficult to style for myself as I wouldn't be able to put tension on the hair. Once my model is seated I started to towel dry the hair and started combing from the bottom of the hair working up the head after all combed through, making a parting nearly ready to start my blow dry putting serum through the hair and mousse following heat defence spray to protect the hair from heat off the hair dryer.

Sectioning the hair, I took quite small sections as this was the first blow dry I have ever given so I felt smaller the sections I would be able to get my sections straight. Each layer felt like was becoming easier as at first I found it all so fiddly with keeping the brush in one hand and hair dryer in the other.
Starting from the root keeping tension on the brush bringing the the hair downwards towards me.
when doing this I found it quite hard to control when holding from the handle so Emma gave me a tip where you can hold from the nozzle it sometimes may get a little hot but I found myself having to much more control over my blow dry and found I was so much quicker too! When I had straight blow dried the whole head to finish the look I put a size of a 10 pence of serum in my hand rubbed together putting this through the models hair and adding shine spray to finish the look ready for camera!


                                                                         Tool used:
                                                                       
                                                               Hair dryer with nozzle
                                                               Denman paddle brush
                                                               Sectioning clips
                                                               Serum
                                                               Shine spray

                                                             
                                                                        Evaluation

When doing this lesson I did like it but wasn't something I enjoyed as I felt my arms ached a lot but being shown to hold the dryer at the nozzle this gave me more control also not causing my arm to ache as much! I felt my final result came out quite well for my first blow dry even though I did moan through most of it my arm was aching! If I was to do the again add more serum to near the end of the hair to give a better finish as you can see the split ends, to over come this rubbing more serum into my hands applying to the lower half of the hair and setting with more shine spray to get a nice finish.

Demo: Straight blowdry

The aim for this lesson was be shown how to wash and condition hair and then onto a straight blow dry as this is important for us to know because if we ever get a model turning up with greasy hair or if had bee shooting and the model had to have dirt in their you would wash and blow dry before they leave the set.
So to start with Emma got her model to sit at the wash basins putting a towel around her neck tucking into their top making sure this stays as this will help keep their neck dry once done so she her model to sit back and corrected the position of the basin to make sure this was comfortable for the model then checking the temperature of the water as she doesn't want burn the head when getting the right temperature started to wet the hair making sure was ready for shampooing rubbing into the top of the head into the tail of the hair rising this and then repeating again to make sure the hair is clean.
Once shampooed she applied conditioner to the tail of the hair taking the remainder up the head and started to massage into close to the temples lightly moving down to the nape.
Ready to be washed Emma checking her water temperature again making sure not too hot or cold for her model rinsing out all the conditioner from the hair, when the water started looking clear without bubbles and the hair looked clear of product ringing the tail of the hair getting her model to learn forward to wrap the towel round the models head.

Taking her model over to her seat, towel drying the hair starting to comb from bottom of the hair working her way up as you should never start from root of the head as you will create a big knot at the end of the hair so starting from the top and working up gives you knot free hair ready to blow dry. Applying serum to the hair and then pulling through the hair then sectioning off into three sections. Using a paddle brush as she wants straight flat blow dry taking from the root and bringing down towards her putting tension on the hair giving a straight blow!


Saturday 14 November 2015

Grease paints applied by us

After Branka's demo I couldn't wait to apply this look myself! Starting with preparing my models skin as I didn't have any MAC fix plus in my kit so I carried on with my cleansing the skin and moisturising as I found my models skin quite dry in areas so added argan oil also to lock the moisture into the skin doing this is important at the start of your treatment because going straight in applying your base with no prep to the skin you will soon see it in your final look with the base now blending well into the skin and clinging to any dry areas so locking in moisture is a must!
Next with my base started mixing using the colours from my grease pallet using skin, mango, white, yellow mixing these all together making my base applying to my models jawline and blending into the neck making sure its correct skin tone for my model. Getting the exact colour I started to blend this out over the face once I had applied to the whole left side as Branka had applied the other for our class demo, I concealed under my models eye getting her to look straight forward into the mirror with her chin into her neck as this helps us make up artists see better under the eye where needs concealing cancelling out any dark circles or bags from under the models eyes also concealing any blemishes on the skin using my already mixed skin tone adding a tiny bit of red and burgundy mixed what is similar to our dema colour D32 that has slightly warmed up my concealer as you shouldn't make concealer light as this will bring attention to what your trying to cover from the human eye, and then to set with Ben Nye under the eye quite heavy so there is no movement under the eye as grease paints are quite greasy/oily and if its set will cause it to move and crease under the eye. 
Next to highlight bringing out those elements of my models face using white from my pallet mixing into my foundation colour so this is bringing elements of the skin out but in a natural look not going in with a just white causing a bright white highlight. pressing this into the skin and ready for me to mix my contour shade for my model using the remainder of my base mixing grey, red, and a bit of brown together to make my contour applying to my models contoured/ shaded areas that I want to create depth to the models face and will make the highlight pop even more!

This time setting my models skin but only lightly as I don't want it to be a heavy just a light layer just enough for the grease paints not to move. Going onto making my shadow using the colours, brown and beige creating a natural brown to buff into the models contour line nothing heavy just enough to give the eye definition, adding black into the lash line outlining the eye also the lower lash line setting with a very light amount of powder setting the eye. 
For the brows combing through with MAC brow gel and then mixing dark brown and grey together and putting through the brow to fill them in not to extend setting with a light layer of powder, nearly finishing my look mixing red, yellow and burgundy to mix for my blush getting my model to smile adding to the apples of the cheeks and buffing into the skin so the blush isn't too harsh the cheek. Adding bit more burgundy to the blush colour to create my lip colour but our palette was giving a different colour causing my lip coming out to be more of a natural colour I did try to correct this colour by adding bit of red but the then caused it to become quite pink! So I mixed in some white this toning it down and I mixed in so natural colour in because I did like this colour mixed so started to work into my models lip. and final touch using the black from the palette getting my model to look up working this into her bottom lashes and then straight ahead to work into the top lashes and finally look down to get right into the top lashes. I would to finish this look fix the face with MAC fix spray to hold the look in place but because I had no fix spray I lightly dusted with Ben Nye fair powder.


When I start my looks I get really into it but this does have me to forget to take step by steps, the image above shows my model with her base, concealed, highlighted and contoured using my grease palette.


Products used:

Base: skin, mango, white and yellow
Concealer: base + red and burgundy
Highlighter: base added with white 
Contour: grey, red, bit of brown mixed with remainder of base
Setting powder: Ben nye (fair)
Eyes: brown and beige
Brow: brow gel following onto dark brown and grey mixed
Blush: red, yellow, burgundy
Lip: red, yellow, burgundy, white
Mascara: black

Evaluation

Applying this look I really enjoyed, as at first thought I may struggle as we was applying a full face with just grease paints but as I started mixing my colours I started to really work with it well. I think being shown this way of applying a full face is a very good tip for every make up artist to know and most importantly helps you work with colour and get to know your colours and feel I learnt a lot in this lesson.
I was really happy with my outcome and if I was to do this again I don't know what I would change or make better as I was really proud of this outcome considering I wasn't confident to begin with but my confidence grew throughout the application.
The one thing I could change would be the start of the brow filling that as I tend to fade my brow to that point and Branka did mention good brows but that would something that I could change but everything else I'm happy with and really enjoyed applying with grease paints would I like to do it again? Yes so give it a try!!


Friday 13 November 2015

Demo: Full make up application with grease paints

For this lesson we were shown how to create a full face with grease paints as one day you could be on set doing hair not having your make up kit but too asked to do a full face and only having your grease paints on you so knowing how to apply a full face with just grease paints applying a full face.

Firstly, prep the skin MAC fix plus and then moisturised where her models skin needed moisture the most. Once the models skin was prepared Branka started to mix her models skin tone using her grease paint colours, neutral yellow, beige, mango, red, reddish brown, brown, natural yellow, lighten with white, more red, 2 yellows, touch of blue, bit more yellow added half a shade lighter then checked onto the skin was a bit too warm for the models skin so added a little whiter and beige to her mixed foundation. She then applied to the models forehead always looking at the models neck as that is the colour your trying to match, getting the correct colour she started to buff the colour into the skin once applied to the whole face, started to mix her concealer for under the eye using red and burgundy mixed onto back of her hand and some of her already mixed foundation mixed together giving a warmth to conceal under the models eye taking out any dark circles/bags from under the eye! As these grease paints can be quite oily and she didn't want any movement under the eye or any creases so she applied quite a heavy layer of powder with a fluffy brush.
For the highlight using the remainder of the skin tone and adding white from her palette mixing these 2 colours together to get her highlight colour applying to bring elements of the face out, found her highlighter bit too strong so added mango to warm up the highlighter then started pressing into the skin with a buffering brush once all highlighted areas were pressed into the skin started to mix a contour shade using the colours grey, red and brown mixing this colour to apply to the contoured / shaded areas then buffed and blended into the skin.
Set the skin with powder again after so this would set the highlight, contour and the foundation but only set lightly this time as she didn't want the powder to be applied heavy.
Onto the eyes once the base had been applied normally Branka and myself would apply the eyes first as you would normally get drop-age from your shadow onto the base but because we being shown how to apply a whole face with grease paints which this won’t cause when applying to the models eye.
Mixing the colours brown and beige from her grease paint pallet mixing these colours to give a soft brown to work and buff into the models contour line, then adding liner worked into the lash line and the lower lash line very lightly then set with some powder so the liner and contour of the socket does move or crease on the eye. Nearly finishing her look using the colours dark brown and grey mixed on the back of her hand and taking the colour through the brows and setting them with a light layer of powder. For the blush using red, yellow and burgundy mixed and applied too apple of the cheek buffing into the skin and also buffed into the lip.
Using black grease paint brushing through the models lashes and for final touch sprayed MAC fix plus this fixes the look in place.


Branka's final look the whole look created with grease paints at first when we were told our lesson was going to be doing a full face with them I wasn't too sure what to think as we were shown a palette of colours not really skin colours but once being shown it’s all about knowing your colours which before this post I uploaded a colour wheel what really does help you know your colours and what colours to mix and not to mix! I thought the final look was such a good outcome and surprised due to using what you normally wouldn't use in a full face below I have inserted an image showing you what was used to create this look and nothing else was used sept from this pallet.


Monday 2 November 2015

Fashion makeup: Colour Wheel

Below I have inserted a colour wheel I created so that it will help throughout applications, to know my colours what mix and what will work.

Highlight and contour by me (dewey)

Health and safety

Before every treatment I will carry out risk assessment this meaning checking my work station making sure is safe for myself, client, and work colleagues surrounding my work area.

Firstly I make sure all bags are tucked under nothing out on the floor causing a hazard, making sure no coats are over the chair or on my station and are hung up and out of the way. Once making sure my area is hazard free I will make sure my clients chair is at the right height so when my client is seated they will be at eye level. This is so its comfortable for my clients and myself as the chair being at the wrong height can cause me to lean and hunch my back a lot throughout the treatment, when your back should always be in a straight posture so this doesn't create any health problems for yourself later on in life.


Above I have inserted two images showing how your posture should be throughout all treatments and how you shouldn't stand throughout as this can cause your back to hunch and cause back pain later on in life.

When nearly ready to start a treatment its always IMPORTANT to wash your hands as you don't want to be touching your clients face without your hands wash as you could be carrying germs to their face, always handy to also keep a small bottle of hand sanitiser on your station if needed to use throughout the treatment.
Each treatment you never use the same brushes on all of your clients ALWAYS clean brushes for every single client as you should never use dirty brushes. When applying your products to your client you shouldn't dip your brush into your product for example dipping your lip brush into your lipstick and then onto your models lip and back to the lipstick as this is cross contamination, the safe way is to use a spatula taking a laying of your product onto the back of your washed clean hand and working from that than rather working from the products container this will the cross out any contaminations in your treatment.  


                                                         Highlight and contour by me 


Firstly prepping my models skin cleansing, toner & moisturise as I found my model had dry patches of skin in certain areas that needed more moisture so that the dryness of the skin wont ruin the application. To over come these dry areas I did apply a rich sensitive moisturiser and following this I applied an argan oil to lock in more moisturiser. Throughout prepping my models skin I was getting to know her undertones so when it came to mixing the right tones for her face I was aware of what colours to mix.
Concealing my model next using my dema palette D0,D3,D7,D32 concealers mixing these together to get the right correction colour for my models skin tone using this this to cover any blemishes or dark circles under the eyes.
For my base I used face and body MAC (C1) straight as my model has a quite a pale tone and this being the lightest foundation we have in face and body where as normally I would have mixed a white face and body to it but non was available, but considering I didn't mix any white to cool the foundation down to my models tone once applied and buffed into the skin I found this became quite good match and wasn't as dark to the models tone as I thought it would be! After building my base and was happy with my application, I mixed clown white super colour palette from my theatrical kit, into my base colour mixing my highlighter on the back of my hand doing this will make highlighter 3 shades lighter. Unfortunately I didn't get an step by step to show my progression throughout my dewey highlight and contour look to show you the development of and highlighted and contour look.  I applied highlighter to the areas I wanted my models features to pop, lightly buffing my highlighter into the skin following onto to mixing my contour colour using, my super colour pallet beige, reddish brown, grey brown, yellow, grey, pink, creating my contour colour to be 4/5 shades up from my models skin as I'm trying to create a shadow of the models features .
When applying to the areas I wanted to shade/contour from top of the ear to the mouth in a shape of a right angle triangle making this shape on the cheek bone but I also filled this shape I created with quite a lot of product and I would say a good tip in make up is always build as if its not enough you can build on your product but soon as you apply lots of product its hard to take away.
With this look I was lucky even though I did apply too much product I blended and buffed into my models skin at first this gave a dirty look and not the shadow of the cheekbone which was meant to be my outcome. Taking a bit more time I did manage to control this 'dirt look' I created, to help overcome this I applied some of my highlighter white clown and base mixed together and applied to under the cheekbone as the 'dirt look' did take up quite an area because I applied far too much product and when trying to blend this out it started to apply under the cheekbone and felt I started to loose control. So applying and blending white clown to under the cheek bone did help me over come my too much product applied and most definitely was a lesson learnt right there!

Once all blended onto finishing my look I used my ring finger to apply strobe to my highlighted areas, applying blusher to my models apples of the cheek getting her to smile using MAC dolly mix and finishing my look taking MAC brow gel through the brows, applying Vaseline as I found my models lips quite dry and cracked so applying this gave them more moisture then finishing this look by giving my model a spritz of rose water to her face giving a beautiful dewey look.


Image above is my model concealed following face and body used as my base, as I mentioned previously I used C1 which was a shade or two darker than my models skin tone but once buffed and blended into the skin on camera and in person did work very well was happy with the outcome. I feel more and more I work with face and body its starting to become my friend as I've mentioned in previous posts I'm not a massive fan of face and body as its not a thick coverage more of a foundation you build layers to finally get to a thicker coverage , but as I've learnt in these past few weeks is how to work it and work with face and body as now to get a more thicker consistency as I've always found it more runny but working into the back of my hand making a thicker foundation which I feel helps more with coverage giving more a full coverage. Making me think face and body isn't too bad and is a foundation I'm starting to like working with throughout the different looks I am creating within my lectures.

                          
Products used:   
                                                                                     
 Concealer: D0, D3, D7, D32 
Base: C1 straight
Highlight: Strobe MAC, white clown + base C1
Contour: super colour palette- beige, reddish brown, grey brown, yellow, grey, pink
Blusher: dolly mix MAC
Brows: brow gel MAC 
Lip: Vaseline
Final touch: rose water

Evaluation

With my final outcome inserted above, if I was to create this look again when applying would be to remember apply less and build the colour as its easy to add more than apply loads cause not so easy to take away! Which I applied too much product with my contour and luckily overcame this. Next time I would use some more rose water over my models face as I feel the images above show the application of the face to look quite matte which wasn't the brief given and was meant to be more of a dewey look! So this is something I would like to recreate to really master this look. Did I like creating this look? Yes I did because I learnt throughout this make up look, and when I came across small problems the 'dirt look' I created, I didn't panic like I would of done in the past I stepped back and thought how can I overcome this came up with what I needed to do and overall was happy with my whole application and the lessons I learnt throughout.